

Apache Hive Tutorial For Beginners Using MySQL Metastore
What is Apache Hive:
Apache Hive, developed by Facebook, is an open-source data warehouse system for analyzing, querying, and summarizing large data sets stored in HDFS.
Apache Hive is doubtlessly a query engine because it lacks its own storage, so it avails the HDFS and different engines ( MapReduce, Tez, Spark, etc) to query. The contrast it makes is the communication factor to the query engine, it uses HQL (=SQL) in lieu of Java, providing an unchallenging environment.
With Apache Hive, comes the metastore, which stores the description of metadata, while metadata stores all the information of the tables. In this article, we are using remote metastore, MySQL, which is an RDBMS, to make things easier for working in a distributed system.
Apache Hive is so matured in recent days, and its name comes in unison with the concept of Big Data. This highly researched and self-tested article covers the installation of Apache Hive on top of Map-Reduce Engine, with MySQL metastore, JDBC connector to connect programs or Web UI with Hive while data is stored in HDFS.
PREREQUISITES:
- Apache Hadoop
- Map Reduce Engine
- Basic SQL Queries
Step 1: Download and Untar Hive
$ wget https://downloads.apache.org/hive/hive-3.1.2/apache-hive-3.1.2-bin.tar.gz
# downloading the hive package online
$ tar xzf apache-hive-3.1.2-bin.tar.gz # extracting the files
Step 2: Configure Hive Environment Variables (bashrc)
$ sudo nano .bashrc # opening the bashrc fileAdd these configurations
export HIVE_HOME="/home/hdoop/apache-hive-3.1.2-bin"
export PATH=$PATH:$HIVE_HOME/bin
These additions are to be done at the end of the bashrc file (Don’t forget to save the
file before exiting)
$ source ~/.bashrc # apply the changes by this commandStep 3: Edit hive-config.sh file
$ sudo nano $HIVE_HOME/bin/hive-config.sh # opening the hive-config.sh fileThis addition is to be done after export HIVE_CONF_DIR line
export HADOOP_HOME=/home/hdoop/hadoop-3.3.1
Save and exit the file then.
Step 4: Create Hive Directories in HDFS
First of all, Run all the required statements of Hadoop
$ cd $HADOOP_HOME/sbin
$ ./start-all.sh
Create two separate directories to store data in the HDFS layer:
• The temporary, tmp directory is going to store the intermediate results of
Hive processes.
• The warehouse directory is going to store the Hive-related tables.
$ hdfs dfs -mkdir /tmp # create a directory ‘tmp’
$ hdfs dfs -chmod g+w /tmp # executing read-write permissions
$ hdfs dfs -ls / # checking if the permissions were added correctly
Now, creating warehouse directory in HDFS
$ hdfs dfs -mkdir -p /user/hive/warehouse
$ hdfs dfs -chmod g+w /user/hive/warehouse # executing read-write permissions
$ hdfs dfs -ls /user/hive # checking if the permissions were added correctly
Step 5: Configure hive-site.xml File
Apache Hive distributions contain template configuration files by default. The
template files are located within the Hive conf directory and outline the default Hive
settings.
$ cd $HIVE_HOME/conf #changing directory
$ cp hive-default.xml.template hive-site.xml
# creating hive-site.xml using hive-default.xml.template
$ sudo nano hive-site.xml
# opening file
Now, change the value of hive.metastore.warehouse.dir to /home/hdoop/apache-hive-3.1.2-bin/warehouse
STEP 6: Metastore Configuration
$ sudo apt-get update
$ sudo apt-get install mysql-server
$ sudo mysql_secure_installation utility
# set the password to “hivepassword” and password strength as ‘0’
$ sudo systemctl start mysql # This command starts the mysql service
$ sudo systemctl enable mysql
# This command ensures that the database server launches after a reboot
Now, go to https://dev.mysql.com/downloads/file/?id=507326 and download
mysql-connector-java-8.0.27.tar.gz.jar and change .jar file name to mysql-
connector-java.jar and copy/move it to home/apache-hive-3.1.2-bin/lib
$ sudo mysql; # login to MySQL shell
sql> CREATE DATABASE metastore;
sql> USE metastore;
sql> SOURCE /home/hdoop/apache-hive-3.1.2-bin/scripts/metastore/upgrade/mysql/hive-schema-3.1.0.mysql.sql;
# creating dB for metastore
sql> CREATE USER 'hiveuser'@'%' IDENTIFIED BY 'hivepassword';
sql> GRANT ALL PRIVILEGES ON *.* TO 'hiveuser'@'%';
sql> flush privileges;
sql> exit; # to logout of MySQL Shell
If there is an error like this "Your password does not satisfy the current policy requirements." then you can run this command to see password validate configuration metrics.
sql> SHOW VARIABLES LIKE 'validate_password%';The output should be something like that :

sql> SET GLOBAL validate_password.policy = LOW;
sql> SET GLOBAL validate_password.length = 6;
sql> SET GLOBAL validate_password.number_count = 0;
Now, open the hive-site.xml file and do the following changes in specific properties
<property>
<name>javax.jdo.option.ConnectionDriverName</name>
<value>com.mysql.jdbc.Driver</value>
<description>MySQL JDBC driver class</description>
</property>
<property>
<name>javax.jdo.option.ConnectionUserName</name>
<value>hiveuser</value>
<description>user name for connecting to mysql server</description>
</property>
<property>
<name>javax.jdo.option.ConnectionPassword</name>
<value>hivepassword</value>
<description>hivepassword for connecting to mysql server</description>
</property>
<property>
<name>hive.metastore.warehouse.dir</name>
<value>/home/hdoop/apache-hive-3.1.2-bin/warehouse</value>
<description>location of default database for the warehouse</description>
</property>
<property>
<name>hive.metastore.uris</name>
<value>thrift://localhost:9083</value>
<description>Thrift URI for the remote metastore.</description>
</property>
<property>
<name>hive.server2.enable.doAs</name>
<value>false</value>
</property>
<property>
<name>hive.metastore.db.type</name>
<value>mysql</value>
</property>
<property>
<name>hive.exec.scratchdir</name>
<value>/tmp/hive</value>
</property>
<property>
<name>hive.exec.local.scratchdir</name>
<value>/tmp/hive/local</value>
</property>
<property>
<name>hive.downloaded.resources.dir</name>
<value>/tmp/hive/resources</value>
</property>
<property>
<name>javax.jdo.option.ConnectionURL</name>
<value>jdbc:mysql://localhost/metastore?serverTimezone=UTC</value>
</property>
</configuration>
Also, remove symbols between words for and transactional which can cause errors
$ $HIVE_HOME/bin/schematool -dbType mysql -initSchema # initiating db schemaIt will always give this error in the end
*** schemaTool failed ***
STEP 7: Configure Hive API authentication
Add the following section to $HIVE_HOME/conf/hive-site.xml file:
<name>hive.metastore.event.db.notification.api.auth</name>
<value>false</value>
<description>
Should metastore do authorization against database notification related APIs such as
get_next_notification.
If set to true, then only the superusers in proxy settings have the permission
</description>
</property>
And then update Hadoop core-site.xml configuration file to append the following configuration
<name>hadoop.proxyuser.hdoop.hosts</name>
<value>*</value>
</property>
<property>
<name>hadoop.proxyuser.hdoop.groups</name>
<value>*</value>
</property>
# you can replace hdoop and * with your username
$ hive --service metastore &
$ hive --service hiveserver2 &
#run these commands to start metastore and hiveserver2 service
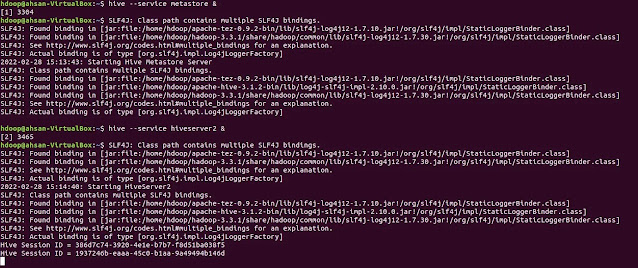
Now open http://localhost:10002/ in the browser.
 |
| HiveServer2 |
For using Hive Shell, you can write hive in the command line


No comments:
Post a Comment
Thank you for submitting your comment! We appreciate your feedback and will review it as soon as possible. Please note that all comments are moderated and may take some time to appear on the site. We ask that you please keep your comments respectful and refrain from using offensive language or making personal attacks. Thank you for contributing to the conversation!