

Easy Install Single-Node Hadoop on Ubuntu 20.04
Introduction:
As the world is turning digital, a gargantuan amount of data is being produced every second, giving birth to Big Data. Hadoop is an Apache-based open-source Big Data framework used for storing, analyzing, and processing vast data, which is implemented in Java.
Created in 2005 by the current Chief Architect of Cloudera, Doug Cutting, to solve two basic problems of Big Data, Storage and Processing. Its structure lies in the concept of distributed storage and distributed processing in a parallel fashion.
Apache Hadoop comprises three components. HDFS, MapReduce, and YARN.
The storage unit, the Hadoop Distributed File System, abbreviated as HDFS, makes copies of the data and stores it across multiple systems. The best part about HDFS is its fault-tolerance quality.
The MapReduce, or MR, a processing unit, is a core engine for doing all the ETLs (Extract, Transformation, and Load). MR operates each part of the Big Data discretely and then combines the result at the end, putting aside a considerate amount of time.
As multiple jobs run on Hadoop simultaneously, they all need more or fewer resources to complete the task successfully, so to adroitly manage these resources, there comes the third component, the YARN, short for Yet Another Resource Negotiator, which consists of Resource Manager, Node Manager, Application Master, and Containers.
This easy article covers the smooth installation of single-node Apache Hadoop as well as multi-node configuration.
PREREQUISITES:
- Linux
- Java
Step 1: Install OpenJDK on Ubuntu
$ sudo apt update
$ sudo apt install openjdk-8-jdk -y # Apache Hadoop 3.x fully supports Java 8
Once the installation process is complete, verify the current Java version:
$ java -version or javac -versionStep 2: Install OpenSSH on Ubuntu
$ sudo apt install openssh-server openssh-client -yStep 3: Create Hadoop User
$ sudo adduser hdoopThe username, in this example, is hdoop. You are free the use any username and password you see fit.
$ su - hdoopSwitch to the newly created user and enter the corresponding password. After creating a new user, you may get the following error while running sudo commands "hdoop is not in the sudoers file. This incident will be reported." So, this error comes because you haven't added sudo permissions to the new user, to add permissions, do the following:
$ su - {initial_user}
$ sudo -i # Go to root
root> usermod -a -G sudo hdoop
root> exit; # Problem solved
Step 4: Enable Passwordless SSH for Hadoop User
For a multi-node cluster, you have to ignore this step, as it doesn't require localhost.
$ ssh-keygen -t rsa -P '' -f ~/.ssh/id_rsa # Generates SSH key pair
$ cat ~/.ssh/id_rsa.pub >> ~/.ssh/authorized_keys
$ chmod 0600 ~/.ssh/authorized_keys # Giving required permissions
$ ssh localhost
Step 5: Download and Install Hadoop on Ubuntu
Visit the official Apache Hadoop project page, and select the binary download version of Hadoop you want to implement.
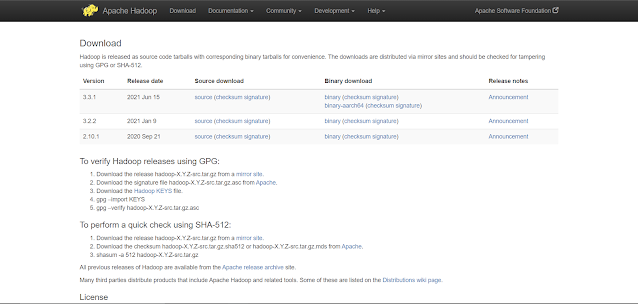 |
| Hadoop Download Page |
The steps outlined in this tutorial use the Binary download for Hadoop Version 3.3.1.
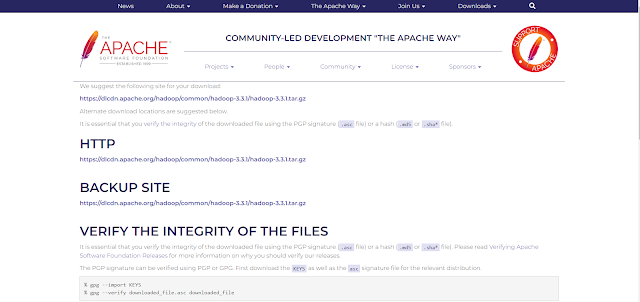 |
| Hadoop 3.3.1 |
$ wget https://dlcdn.apache.org/hadoop/common/hadoop-3.3.1/hadoop-3.3.1.tar.gz
# Downloads hadoop-3.3.1 using wget
$ tar xzf hadoop-3.3.1.tar.gz # Extracts the tar to the hadoop-3.3.1 directory.
Setup IP-Configuration (Multi-Node only)
Before configuring the files of Hadoop, you have to set up the IP address connection between the two devices, they must be on the same LAN/WIFI network to be able to communicate with each other.
Open your hosts file using the below command:
$ sudo nano /etc/hosts # For opening hosts file
Enter the IPs of your hadoop-master and hadoop-slave PC like
192.168.0.xx2 hadoop-master
192.168.0.xx1 hadoop-slave
You have to do this step in all your connected nodes then move on to the next step.
Step 6: Hadoop Deployment on Single Node
A Hadoop environment is configured by editing a set of configuration files:
- bashrc
- hadoop-env.sh
- core-site.xml
- hdfs-site.xml
- mapred-site-xml
- yarn-site.xml
Configure Hadoop Environment Variables (bashrc)
$ sudo nano .bashrc # For opening .bashrc file
Define the Hadoop environment variables by adding the following content to the end of the file:
#Hadoop Related Options
export HADOOP_HOME=/home/hdoop/hadoop-3.3.1
export HADOOP_INSTALL=$HADOOP_HOME
export HADOOP_MAPRED_HOME=$HADOOP_HOME
export HADOOP_COMMON_HOME=$HADOOP_HOME
export HADOOP_HDFS_HOME=$HADOOP_HOME
export YARN_HOME=$HADOOP_HOME
export HADOOP_COMMON_LIB_NATIVE_DIR=$HADOOP_HOME/lib/native
export PATH=$PATH:$HADOOP_HOME/sbin:$HADOOP_HOME/bin
export HADOOP_OPTS="-Djava.library.path=$HADOOP_HOME/lib/native"
Now, save and exit the .bashrc file.
It is vital to apply the changes to the current running environment by using the following command:
$ source ~/.bashrcEdit hadoop-env.sh File
$ sudo nano $HADOOP_HOME/etc/hadoop/hadoop-env.sh
# For opening hadoop-env.xml file
export JAVA_HOME=/usr/lib/jvm/java-8-openjdk-amd64
$ readlink -f /usr/bin/javac # This tells the path to your OpenJDK directory
Edit core-site.xml File
$ sudo nano $HADOOP_HOME/etc/hadoop/core-site.xml #For opening core-site.xml fileAdd the following configuration:
<property>
<name>hadoop.tmp.dir</name>
<value>/home/hdoop/tmpdata</value>
</property>
<property>
<name>fs.default.name</name>
<value>hdfs://127.0.0.1 or hadoop-master:9000</value>
</property>
</configuration>
Edit hdfs-site.xml File
The properties in the hdfs-site.xml file govern the location for storing node metadata, fsimage file, and edit log file. Configure the file by defining the NameNode and DataNode storage directories.
Additionally, the default dfs.replication value of 3 needs to be changed to 1 to match the single node setup.
$ sudo nano $HADOOP_HOME/etc/hadoop/hdfs-site.xml # For opening hdfs-site.xml file
Add the following configuration:
<property>
<name>dfs.data.dir</name>
<value>/home/hdoop/dfsdata/namenode</value>
</property>
<property>
<name>dfs.data.dir</name>
<value>/home/hdoop/dfsdata/datanode</value>
</property>
<property>
<name>dfs.replication</name>
<value>1</value>
</property>
</configuration>
Edit mapred-site.xml File
$ sudo nano $HADOOP_HOME/etc/hadoop/mapred-site.xml # For opening mapred-site.xml file
Add the following configuration:
<property>
<name>mapreduce.framework.name</name>
<value>yarn</value>
</property>
</configuration>
Edit yarn-site.xml File
$ sudo nano $HADOOP_HOME/etc/hadoop/yarn-site.xml # For opening yarn-site.xml file
Step 7: Format HDFS NameNode
It is important to format the NameNode before starting Hadoop services for the first time only:
$ hdfs namenode -format
Step 8: Start Hadoop Cluster
Navigate to the hadoop-3.3.1/sbin directory and execute the following command:
$ ./start-all.sh
This will start namenode, datanode, secondary namenode, and YARN resource manager and nodemanager. To check if all the daemons are active and running as Java processes:
$ jps

Note: If you see that datanode is not running on jps command then to fix this, you have to delete dfsdata and tmpdata folder in your home directory. Then reiterate Step 8.
Now, your Hadoop is up and running and ready to use. To stop the Hadoop cluster, you can use the below command:
$ ./stop-all.sh # To stop Hadoop Services
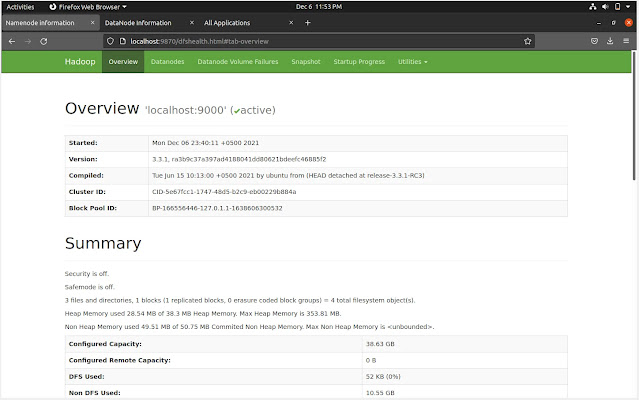
Access Hadoop UI from Browser
http://localhost:9870 # Hadoop NameNode UI
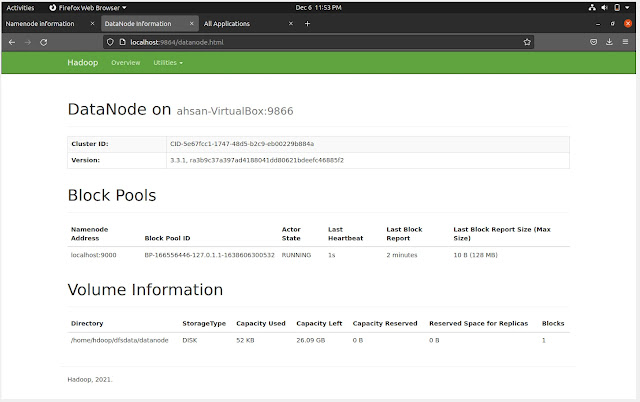
http://localhost:9864 # Hadoop DataNodes UI
http://localhost:8088 # YARN Resource Manager

Conclusion
You have successfully installed Hadoop on Ubuntu and deployed it in a single-node mode. To perform map-reduce jobs, I will be writing a new blog to explain the process in detail.


No comments:
Post a Comment
Thank you for submitting your comment! We appreciate your feedback and will review it as soon as possible. Please note that all comments are moderated and may take some time to appear on the site. We ask that you please keep your comments respectful and refrain from using offensive language or making personal attacks. Thank you for contributing to the conversation!