Django CRUD Function - Hands-On Project
Django Setup
Go and check this out for Django setup https://www.techaeblogs.live/2022/04/how-to-render-rest-api-on-django.html
Django CRUD Function
This article revolves around the complete implementation of the CRUD function in Django (Create, Retrieve, Update, Delete). Let’s discuss what actually CRUD means,
- Create — to add a particular entry
- Retrieve — to retrieve a particular entry in the detail
- Update — to update a particular entry
- Delete — to delete a particular entry
So, without any delay, let’s get started. We will create a simple CRUD app to manage information.
1. Create models in appname/models.py
from django.db import models

# Create your models here.
class Bio(models.Model):
    name = models.CharField(max_length=10)

    def __str__(self):
        return self.name
2. Migrate the database, by running the following commands on terminal
python manage.py migrate

python manage.py makemigrations
3. Register database in appname/admin.py
from django.contrib import admin

from .models import Bio

admin.site.register(Bio)
4. Adding path in appname/urls.py
from django.urls import path
from appnames import views

app_name = 'appname'

urlpatterns = [
    path('bio/', views.postData, name="postData"),
    ]
5. Make a template folder and create a file biodata.html. Adding all these links.
<meta charset="utf-8">
    <meta name="viewport" content="width=device-width, initial-scale=1, shrink-to-fit=no">
    <meta http-equiv="x-ua-compatible" content="ie=edge">
    <title>Django crud</title>
  <link href="https://cdnjs.cloudflare.com/ajax/libs/font-awesome/5.13.0/css/all.min.css" rel="stylesheet">
  <link rel="stylesheet" href="https://cdn.jsdelivr.net/npm/bootstrap@4.3.1/dist/css/bootstrap.min.css" integrity="sha384-ggOyR0iXCbMQv3Xipma34MD+dH/1fQ784/j6cY/iJTQUOhcWr7x9JvoRxT2MZw1T" crossorigin="anonymous">
  <script src="https://code.jquery.com/jquery-3.3.1.slim.min.js" integrity="sha384-q8i/X+965DzO0rT7abK41JStQIAqVgRVzpbzo5smXKp4YfRvH+8abtTE1Pi6jizo" crossorigin="anonymous"></script>
  <script src="https://cdn.jsdelivr.net/npm/popper.js@1.14.7/dist/umd/popper.min.js" integrity="sha384-UO2eT0CpHqdSJQ6hJty5KVphtPhzWj9WO1clHTMGa3JDZwrnQq4sF86dIHNDz0W1" crossorigin="anonymous"></script>
  <script src="https://cdn.jsdelivr.net/npm/bootstrap@4.3.1/dist/js/bootstrap.min.js" integrity="sha384-JjSmVgyd0p3pXB1rRibZUAYoIIy6OrQ6VrjIEaFf/nJGzIxFDsf4x0xIM+B07jRM" crossorigin="anonymous"></script>
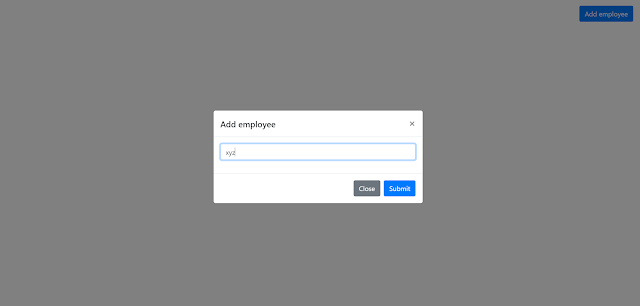
Making ADD functionality, where data can be added and can be viewed on the frontend.
6. Adding Add button in biodata.html
    <button class="btn btn-primary mt-3 mr-0 ml-auto d-flex mb-4"
      role="button"
      data-toggle="modal"
      data-target="#addModalCenter">
      Add employee
    </button>
Here you can see the Add button
http://127.0.0.1:8000/bio/8. Create an Add form
<!-- Add -->
<div class="modal fade" id="addModalCenter" tabindex="-1" role="dialog" aria-labelledby="addModalCenterTitle"
aria-hidden="true">
<div class="modal-dialog modal-dialog-centered" role="document">
<div class="modal-content">
<div class="modal-header">
<h5 class="modal-title" id="addModalLongTitle">Add employee</h5>
<button type="button" class="close" data-dismiss="modal" aria-label="Close">
<span aria-hidden="true">×</span>
</button>
</div>
<div class="modal-body">
<form action="{% url 'appname:postData'%}" class="user" method= 'POST'>
{% csrf_token %}
<input type="text" class="form-control" id="addEmployee" placeholder="name" name="description" required/>
</div>
<div class="modal-footer">
<button type="button" class="btn btn-secondary" data-dismiss="modal">
Close
</button>
<button type="submit" class="btn btn-primary">Submit</button>
</div></form>
</div>
</div>
</div>
<!-- EndAdd -->9. Create a function in views.py to enter data into the database.
from django.shortcuts import render, redirect
from .models import Bio

def postData(request):
    try:
        employee_name = request.POST["description"]
        x = Bio.objects.create(
        name = employee_name)
        return redirect(f"/bio")

    except Exception as e:
        employee_list = Bio.objects.all().values()
        return render(request,'biodata.html', {'employee_list': employee_list})
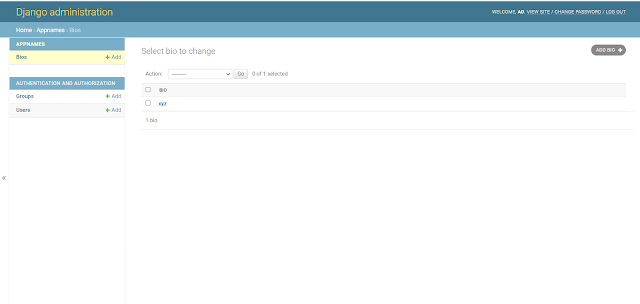
10. Adding the employees' field and data would be viewed on the Database.
11. Check out the entry on http://127.0.0.1:8000/admin
12. Render admin data on the frontend
<div class="container-fluid" id="main-container">
  <div class="container-fluid">
    <div class="row">
    {% for data in employee_list %}
      <div class="col-sm-4 col-md-3 mb-3">
        <div class="card border-primary">
          <div class="card-body">
            <p class="card-text text-dark">
              <span class="ml-3" id="data_{{data.id}}">{{ data.name }} </span>
              <span
                class="material-icons float-right"
                data-toggle="modal"
                data-target="#deleteModal"
                data-employee-id="{{ data.id }}"
                role="button"
                style="color: red"
                onclick="set_delete_employee_value(this)"
                >delete</span>
              <span
                class="material-icons float-right mr-2"
                role="button"
                data-employee-id="{{ data.id }}"
                data-toggle="modal"
                data-target="#editModalCenter"
                style="color: green"
                onclick="set_edit_employee_value(this)"
                >edit</span>
            </p>
          </div>
        </div>
      </div>
      {% endfor %}
    </div>
  </div>
13. Tadda!
14. Adding Edit form that will view the pre-entered value of the entry
<!-- Edit -->
<div
class="modal fade"
id="editModalCenter"
tabindex="-1"
role="dialog"
aria-labelledby="editModalCenterTitle"
aria-hidden="true"
>
<div class="modal-dialog modal-dialog-centered" role="document">
<div class="modal-content">
<div class="modal-header">
<h5 class="modal-title" id="editModalLongTitle">Edit Employee</h5>
<button
type="button"
class="close"
data-dismiss="modal"
aria-label="Close"
>
<span aria-hidden="true">×</span>
</button>
</div>
<form action="{% url 'appname:update_employee' %}" method="POST">
{% csrf_token %}
<div class="modal-body">
<label for="validation" class="form-label">Employee Name </label>
<input type="hidden" name="edit_employee_id" id="employee_id_set">
<input
type="text"
class="form-control"
id="editEmployee"
name="edit_employee_name"
required
/>
</div>
<div class="modal-footer">
<button type="button" class="btn btn-secondary" data-dismiss="modal">
Close
</button>
<button type="submit" class="btn btn-primary">Save changes</button>
</div>
</form>
</div>
</div>
</div>
<!-- EndEdit -->15. Adding scripts in the same file
<script>
  function set_edit_employee_value(edit_button_element) {
     // Get values from card
      let employee_id = $(edit_button_element).attr("data-employee-id");
      let employee_name_id = "#data_" + employee_id;
      let name = $(employee_name_id).text();
      // Set values in form
      $("#employee_id_set").val(employee_id);
      $("#editEmployee").val(name)
  }
</script>
16. Adding edit function to views.py
def update_employee(request):
    employee_id = request.POST["edit_employee_id"]
    employee_name = request.POST["edit_employee_name"]
    selected_employee = get_object_or_404(Bio, pk=employee_id)
    selected_employee.name = employee_name
    selected_employee.save()
    return redirect(f"/bio")
17. Adding URL to appname/urls.py
path('update_employee/', views.update_employee, name='update_employee')18. Adding delete form that will take permission to delete the selected entry
<!-- Delete -->
<div id="deleteModal" class="modal fade" tabindex="-1" role="dialog" aria-hidden="true">
<div class="modal-dialog modal-dialog-centered" role="document">
<div class="modal-content border-0">
<div class="modal-body p-0">
<div class="card border-0 p-sm-3 p-2 justify-content-center">
<div class="card-header pb-0 bg-white border-0">
<div class="row">
<div class="col ml-auto">
<button type="button" class="close" data-dismiss="modal" aria-label="Close">
<span aria-hidden="true">×</span>
</button>
</div>
</div>
<p class="font-weight-bold mb-2">
Are you sure you wanna delete this ?
</p>
<p class="text-muted">This change will reflect in your portal.</p>
</div>
<form action="{% url 'appname:delete_employee' %}" method="post">
{% csrf_token %}
<div class="card-body px-sm-4 mb-2 pt-1 pb-0">
<div class="row justify-content-end no-gutters">
<div class="col-auto">
<input type="hidden" name="employee_id_delete" id="employee_id_set_delete">
<button
type="button" class="btn btn-light text-muted px-4 mr-2" data-dismiss="modal">
Cancel
</button>
</div>
<div class="col-auto">
<button
type="submit"
class="btn btn-danger px-4"
>
Delete
</button>
</div>
</div>
</div>
</form>
</div>
</div>
</div>
</div>
</div>
<!-- EndDelete -->19. Adding scripts to biodata.html
<script>
function set_delete_employee_value(delete_button_element) {
      // Get id
      let employee_id = $(delete_button_element).attr("data-employee-id");
      // Set values in form
      $("#employee_id_set_delete").val(employee_id);
  }
</script>
20. Adding delete function to views.py
 def delete_employee(request):
    employee_id = request.POST["employee_id_delete"]
    selected_employee = get_object_or_404(Bio, pk=employee_id)
    selected_employee.delete()
    return redirect(f"/bio")
21. Adding URL in appname/urls.py
path('delete_employee/', views.delete_employee, name='delete_employee'),And, here is the final conclusion
Thank you for reading!
So we found a clear method to create a CRUD Function using Django with a simple user interface. I hope this will help you.
If you found this article useful, stay tuned for more articles on Django.
Cheers!


Great, much useful for Django beginners.
ReplyDelete