Computer Vision Series - Part 1
What is Gaussian Noise?
The term "noise" refers to any undesired and/or random phenomena that might degrade an image by distorting its original information and making any preprocessing step more difficult to be carried out. There exist a plethora of noise sources that can affect images, some of which are controllable by the potential means of undoing (reversing) their effect, while others are extremely difficult to formulate and hence less obvious for overcoming their effect. Some common sources of noise include image sensors, scanners, optic defects, relative motion, shot noise, and atmospheric turbulence, among others. Impulse (salt and pepper) noise is caused by A/D converter saturation, transmission errors, memory errors, and resulting in black pixels in white regions and white pixels in black regions.
The probability density function "ρ" of a Gaussian random variable "z" is given by:
where "z" represents the grey level, "μ" is the mean value, "σ" is the standard deviation, and/or σ^2 is the variance. SD and variance are the main factors used to determine the smoothness of the image.
It is important to know that:
Gaussian noise equally affects each and every pixel of an image.
Step # 1: Generating Gaussian Noise
Let's start off by generating some random gaussian noise via Numpy.
CODE:
import cv2
import numpy as np
from google.colab.patches import cv2_imshow

img = cv2.imread('apple.jpg')
# Generate Gaussian noise
gauss = np.random.normal(0,1,img.size)
gauss = gauss.reshape(img.shape[0],img.shape[1],img.shape[2]).astype('uint8')
# Add the Gaussian noise to the image
img_gauss = cv2.add(img,gauss)
# Display the image
cv2_imshow(img_gauss)
Let's see the effect of Standard Deviation on the image and noise.
CODE:
import cv2
import numpy as np
from google.colab.patches import cv2_imshow

img = cv2.imread('apple.jpg')
# Generate Gaussian noise
gauss = np.random.normal(0,3,img.size)
gauss = gauss.reshape(img.shape[0],img.shape[1],img.shape[2]).astype('uint8')
# Add the Gaussian noise to the image
img_gauss = cv2.add(img,gauss)
# Display the image
cv2_imshow(img_gauss)
OUTPUT:
GAUSSIAN FILTERS:
 |
| Gaussian Distribution |
+2σ account for 95%, and those between -3σ and +3σ account for 99.7%. This is very important when designing a Gaussian kernel of fixed length.
How does the kernel convolve?
Consider the following kernel:
[1, 2, 1]
[2, 4, 2]
[1, 2, 1]
The convolution of a Gaussian kernel is identical to the Box Blur kernel. Think of the box blur as dividing the sum of the kernel values, which totals 9. In the Gaussian kernel illustrated above, the sum of the kernel values is 16.
The above animation is an illustration of how the Gaussian kernel works. For every stride, every pixel of the image is multiplied by the kernel weights and added. The output value is replaced with the central pixel as shown in the animation above. This iterates for every stride. The border pixels are fixed by padding zero thereby creating a black thin border in the output image.
Step # 2: Removing Gaussian Noise with a Gaussian Filter
Here we will be using OpenCV2 for implementing the Gaussian Filter on the image produced above having Gaussian Noise. We will apply cv2.GaussianBlur() to remove noise.
SYNTAX:
cv2.GaussianBlur(input_image, kernel_size, sigmaX[, dst[, sigmaY[,borderType=BORDER_DEFAULT]]])
If the Sigma values are given as zero, they're calculated from the kernel size. Let's dive into the code now!
CODE:
import numpy as np
import cv2
from google.colab.patches import cv2_imshow

'''This is the same image variable we created in the code above.'''
img = img_gauss

gaussian_using_cv2 = cv2.GaussianBlur(img, (3,3), 0, borderType=cv2.BORDER_CONSTANT)
''' BORDER_CONSTANT - Pad the image with a constant value (i.e. black or 0)
(3x3) = > kernel size
img => input image'''

# For Display
cv2_imshow( img)
cv2_imshow(gaussian_using_cv2)
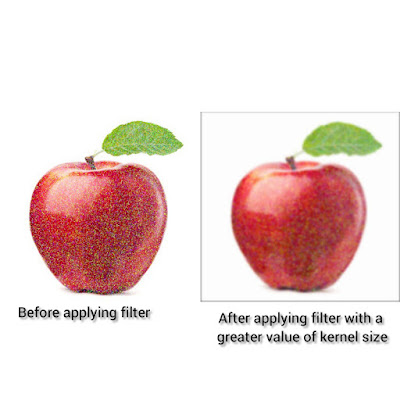
Note that we have kept the kernel size as "3 x 3". It is very important to keep in mind that the kernel size should be "odd" and "positive". Also, we've padded the output image with zeros to deal with boundary pixels.
Assuming that you are following the blog so far, now let's increase the kernel size and see if there is any difference in the output.
import numpy as np
import cv2
from google.colab.patches import cv2_imshow

'''This is the same image variable we created in the code above.'''
img = img_gauss

gaussian_using_cv2 = cv2.GaussianBlur(img, (11,11), 0, borderType=cv2.BORDER_CONSTANT)
''' BORDER_CONSTANT - Pad the image with a constant value (i.e. black or 0)
(3x3) = > kernel size
img => input image'''

# For Display
cv2_imshow( img)
cv2_imshow(gaussian_using_cv2)
OUTPUT:
Observe how the kernel size plays a vital role in blurring noise in an image. As a practice, you can change other values as well, and observe the results.
CONCLUSION
In this article, we learned what is Gaussian noise and how to add random Gaussian noise to an image through Python. We also went through the math behind Gaussian Filters. The tails of a Gaussian function have an amplitude that is effectively zero beyond three standard deviations from the mean. I'm hoping that by the end of this article you know how the Gaussian kernel convolves, and how it affects the "blur".
Hope this was helpful to you. I'm planning to post some more articles on image processing. Please feel free to put up your feedback through the comments section!


.jpeg)


Great! Well written and to-the-point information. Thanks for the amazing blog.
ReplyDeleteVery informative. Thanks for sharing the information.
ReplyDeleteAmazingly delivered the core of the topic "Gaussian noise". Code samples and output visuals help readers to understand and follow the article while implementing.
ReplyDeleteThanks for sharing the useful information.
Very impressive and informative! Worthy of praise!
ReplyDeleteThanks for this precise writing 👍
ReplyDeleteQuite impressive!
ReplyDeleteLove your blog. keep up the good work :)
ReplyDeleteCool graphic
ReplyDelete